When writing an asp.net core application you often need to be able to perform some operations in a development environment that you would not perform in production. This could be for the purposes of debugging or for performance. It could also be that you need to be able to test various features or provide new features in development that you do not want in the release or production environment.
The dotnet core environment makes it easy to determine the current environment and has some built in environments that you can use. Two of these are the Development environment and the Production environment. As you can guess, the Development environment is for when you are running your code in a development environment. If the current environment cannot be determined then it will default to Production.
When running an asp.net site in IIS you may want to set the environment to Development for a specific site. If you want the entire server environment to run in Development then you can add a system environment variable. The name of the variable to set is ASPNETCORE_ENVIRONMENT and you simply set the value to, you guessed it, Development.
Setting the variable for one particular site on your IIS to run in this mode is easier and less disruptive.
Find Your Site
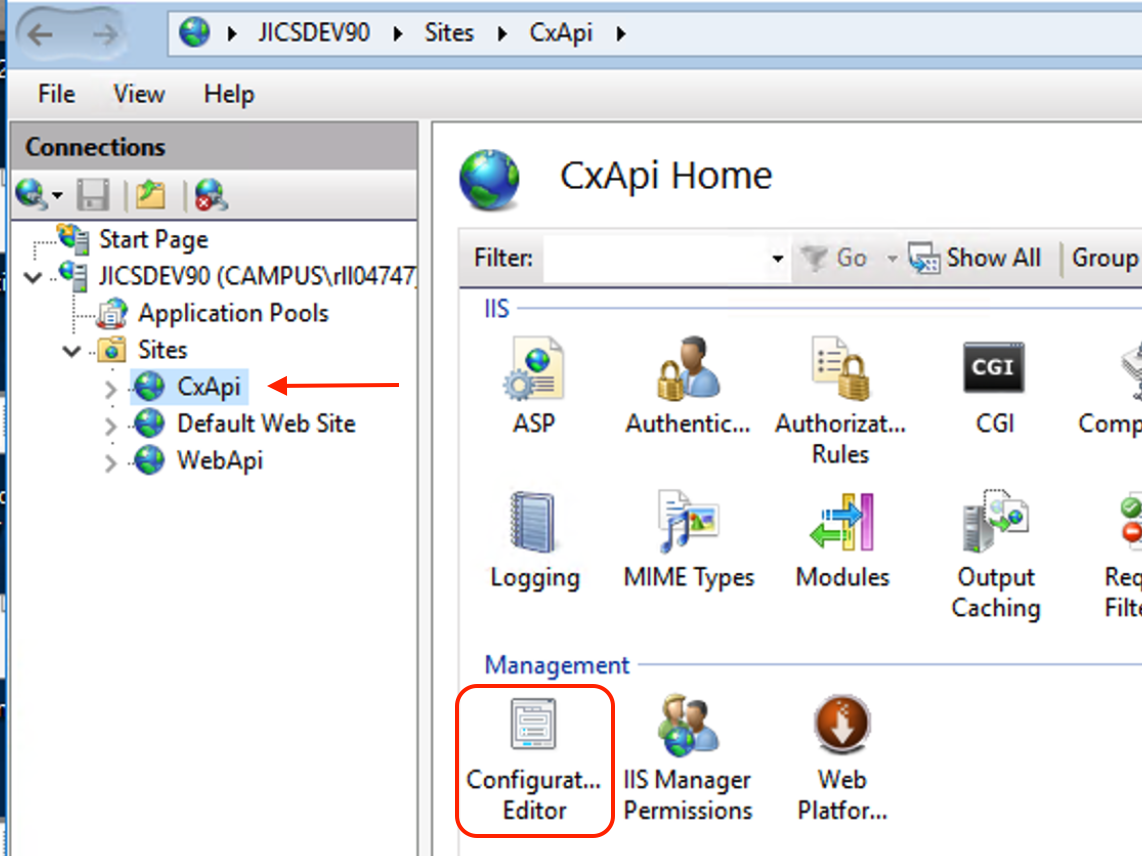
Start by opening the IIS Manager. Then select the site for which you want to modify the environment variable. This will bring up the panel of options on the right which includes the "Configuration Editor" under "Management" section. Click on this to open it.
Configuration Editor Icon
Once open select the system.webServer/aspNetCore section and then select the environmentVariables item from the list. On the right will be a small button with an ellipsis, click on that to open an additional window called the Collection Editor for editing the variables.
Add the variable
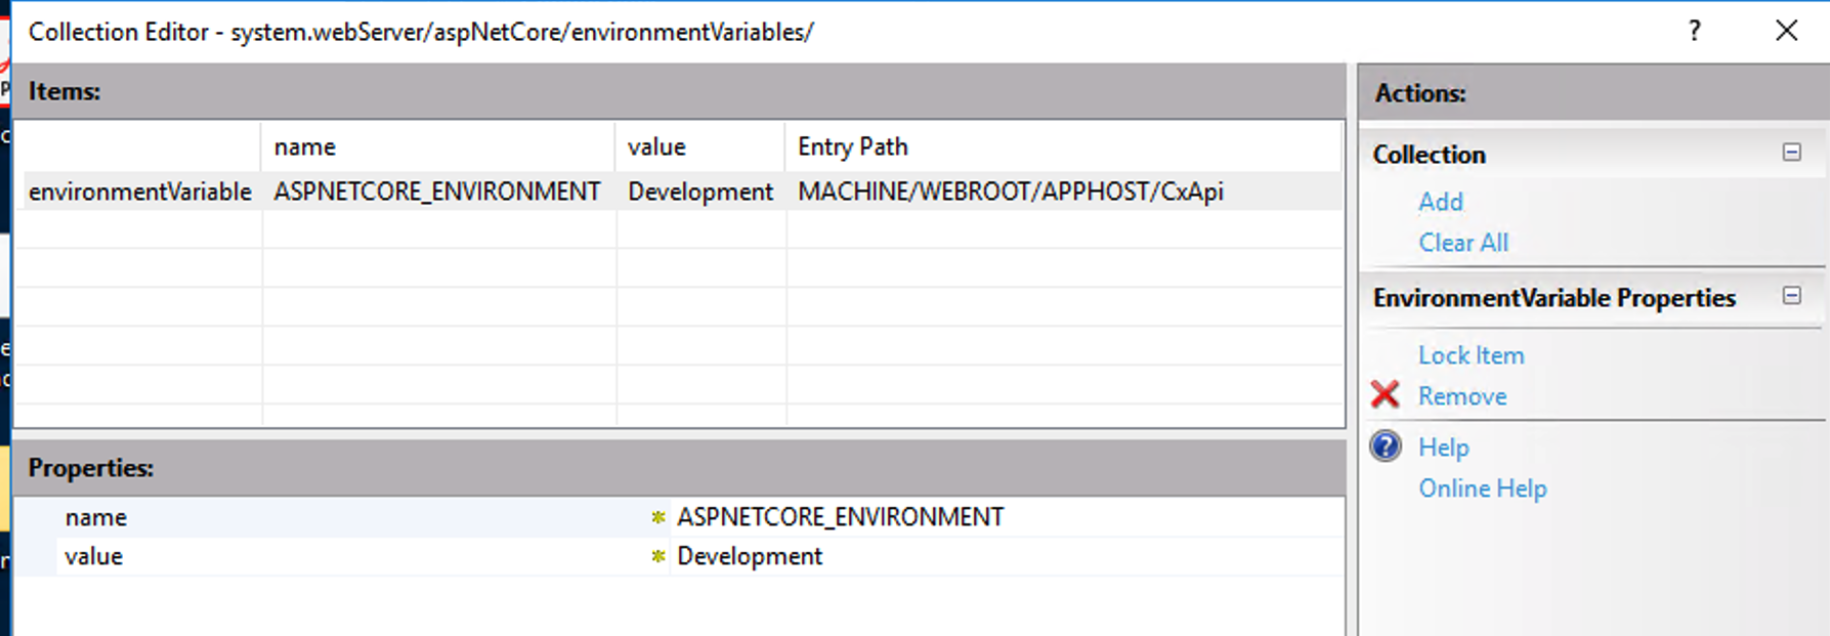
In the new Collection Editor window click the "Add" button on the right side under "Actions". This will add a new environment variable to be set. In the "Properties" section there is a "name" and a "value" row. In the "name" row set the name of the variable to ASPNETCORE_ENVIRONMENT. For the value set it to Development. You can set the variable to any value. However, the dot net core environment will only recognized a few pre-defined values. If you choose a non-standard value you will need to look for it specifically in your code.
Collection Editor
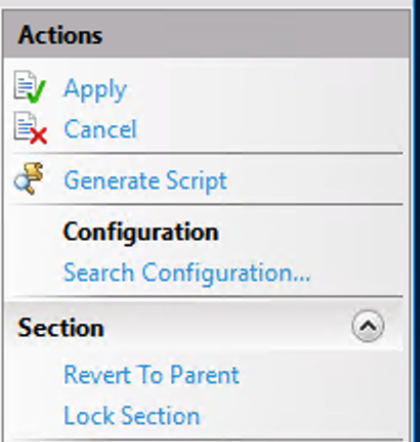
After setting the name and value close the Collection Editor window. Now click the Apply button under the "Actions" section to apply your changes.
Apply
Restart The Site
When making a change to the environment variable for the site you are really just putting an entry into the local web.config. When you save the changes to the web.config this triggers IIS to reload the web.config. This means that you do not need to do anything special to get the new variable to take effect.
If for some reason you are not seeing the results you expect you can restart the Application Pool that the site is in to trigger the reload.
As of this writing the package is in pre-release with version 2.0.0-beta1.21216.1. This means that to install it you will need to include the --prerelease flag when installing with dotnet add package.
There are a number of features in this tool and I encourage you to visit the NuGet page or the GitHub site for the latest information.
Once you have configured the command line with the available commands, options, and arguments you can run your application and pass in the arguments. CommandLine will parse the tokens provided on the command line and evaluate them against the configured command line.
Create new project from template
Using the dotnet new command, create a application based upon the console template.
$ dotnet new console --output SimpleCmdLine/src --name SimpleCmdLine
The template "Console Application" was created successfully.

Processing post-creation actions...
Running 'dotnet restore' on SimpleCmdLine/src/SimpleCmdLine.csproj...
  Determining projects to restore...
  Restored /Users/iesoftwaredeveloper/repos/SimpleCmdLine/src/SimpleCmdLine.csproj (in 66 ms).
Restore succeeded.
$
Once the dotnet new command has completed you will should have a new directory called SimpleCmdLine in the current directory. Change to the new directory and then the src directory and then list the files that were created.
$ cd SimpleCmdLine
$ cd src
$ ls
Program.cs      SimpleCmdLine.csproj
$
You can see that the template created two files. The first is the project file SimpleCmdLine.csproj and the other is the main file for the project called Program.cs.
Now that we have added the base template code to the repository I want to quickly tag it so that we can easily return to this point in the code if we want to. There are a number of ideas on how to name a tag. You can use whatever format you find useful. I am going to use the tag "initial" to indicate that this is the intial base code. After creating a tag it is not automatically pushed to a remote. We will verify that the tag was created and then push it to the remote.
The repository is now in a great initial state. The console project is all base code that is provided to us by the dotnet template and the repository has one branch (main) and one tag (initial) to preserve it in all of its glory for posterity.
Verify Initial build and run
Before we go any further we should make sure that the code we have will build and run successfully. There is not reason it should not since this is just boilerplate template code. Ideally you would do this before you commit and push to a repository. Since I am confident the template was going to work without issues I created the repository before verifying.
# cd to the directory with the source.
$ cd src
$ dotnet build
Microsoft (R) Build Engine version 16.9.0+57a23d249 for .NET
Copyright (C) Microsoft Corporation. All rights reserved.

  Determining projects to restore...
  All projects are up-to-date for restore.
  SimpleCmdLine -> /Users/iesoftwaredeveloper/repos/SimpleCmdLine/src/bin/Debug/net5.0/SimpleCmdLine.dll

Build succeeded.
    0 Warning(s)
    0 Error(s)

Time Elapsed 00:00:00.97
$ dotnet run
Hello World!
$
The build completed without any warnings or errors. That is a good sign. Running the application also works as expected. We are off to a good start.
While not really necessary for writing a simple application I like to add GitHub actions to projects. This helps to automate the building and testing of changes to ensure that we don't accidently introduce known defects.
In the root directory of your git repo do the following:
$ git checkout -b workflow
Switched to a new branch 'workflow'
$ git branch
  main
* workflow
$ mkdir -p .github/workflows
$ cd .github/workflows
$
GitHub Actions uses YAML syntax to define all of the necessary elements of a workflow. To enable the workflow they are stored in the .github/workflows direction of the repository.
Create workflow file
For this project we are going to create simple dotnet.yaml to enable a dotnet core workflow which will build and test the project.
First we want to give the workflow a name. This is the name that will appear on the GitHub Actions tab. If no name is provided then GitHub will use the name of the file.
name: .NET CI
The next step is to define some events that will trigger the workflow. I only want to trigger the workflow when changes are pushed to the main branch or when a pull request to the main branch is made.
By running the workflow when there is a pull request I can ensure that the code properly compiles and passes any tests before merging with the main branch.
Once code has been pushed to the main branch we run the workflow as well to make sure that the merges did not break anything.
By limiting the trigger to the main branch changes can be made on feature branches without triggering the workflow. This is useful since GitHub actions is billable by time used and we want to minimize the amount of time spent to only those actions that are important.
on:
  push:
    branches: [ main ]
  pull_request:
    branches: [ main ]
Now that we have determined what will trigger the workflow to run we need to define what the workflow will do. This can be one or more jobs. For this case we only need a single job.
Here we create the job build and give it a more descriptive name of Build and Test. This particular job we want to execute on the latest version of ubuntu.
jobs:
  build:

    name: Build and Test
    runs-on: ubuntu-latest
The last part of our workflow is going to be the steps necessary to execute the job. These steps are executed in the order that they appear. Each step in a job executes on the same environment and the results of each step is available to subsequent steps.
The first line steps is used to group all of the steps for the job.
The next line is the uses keyword. This retrieves another action. It is basically including additional steps from an external source. In this case from the community action actions/checkout@v2. This step will check out the code from the repository so that it is available to the environment.
The next step includes another community action called actions/setup-dotnet@v1. This is used to setup the environment to be able to use the dotnet tools. This step includes a few other keywords also. The first is the name parameter which we have used previously. This simply provides a friendly name for the step. The other keyword is the with keyword. This provides input to the action. In this case it is indicating the version of dotnet to be used.
Now that we have the environment setup and ready we can peform the steps necessary to actually build and test the project. Again we have the familiar name keyword used to provide a friendly name to the step.
There are two new keywords that we are using for each of these steps. The run keyword is used to specify a command to be executed. The working-directory is used to set the base directory where the command should be executed.
The dotnet restore command will restore any packages needed to build the project.
dotnet build --no-restore will build the project without attempting to perform the restore. We don't need to restore anything since we completed that in the previous step.
Once the project has been compiled we will want to run any tests to ensure that everything is working as we expect. This is accomplished by executing dotnet test --no-build --verbosity normal.
- name: Restore dependencies
run: dotnet restore
working-directory: ./src
- name: Build
run: dotnet build --no-restore
working-directory: ./src
- name: Test
run: dotnet test --no-build --verbosity normal
working-directory: ./src
Here is the entire file.
name: .NET CI
on:
push:
branches: [ main ]
pull_request:
branches: [ main ]
jobs:
build:
name: Build and Test
runs-on: ubuntu-latest
    steps:
    - uses: actions/checkout@v2
    - name: Setup .NET
      uses: actions/setup-dotnet@v1
      with:
        dotnet-version: 5.0.x
    - name: Restore dependencies
      run: dotnet restore
      working-directory: ./src
    - name: Build
      run: dotnet build --no-restore
      working-directory: ./src
    - name: Test
      run: dotnet test --no-build --verbosity normal
      working-directory: ./src
Push workflow to repository
Now that the workflow file has been created it is time to push it up to the GitHub repo by performing the following steps.
Verify current branch
Add workflow file
Commit workflow file
Push to remote branch
$ git branch
  main
* workflow
$ git add .github/workflows/dotnet.yaml
$ git status
On branch workflow
Changes to be committed:
  (use "git restore --staged <file>..." to unstage)
    new file:   .github/workflows/dotnet.yml

Untracked files:
  (use "git add <file>..." to include in what will be committed)

$ git commit -m "Add dotnet.yaml workflow"
[workflow 9caee5a] Add dotnet.yaml workflow
 1 file changed, 29 insertions(+)
 create mode 100644 .github/workflows/dotnet.yml
$ git push origin workflow
Enumerating objects: 6, done.
Counting objects: 100% (6/6), done.
Delta compression using up to 16 threads
Compressing objects: 100% (3/3), done.
Writing objects: 100% (5/5), 708 bytes | 708.00 KiB/s, done.
Total 5 (delta 0), reused 0 (delta 0), pack-reused 0
remote:
remote: Create a pull request for 'workflow' on GitHub by visiting:
remote:      https://github.com/iesoftwaredeveloper/SimpleCmdLine/pull/new/workflow
remote:
To github.com:iesoftwaredeveloper/SimpleCmdLine.git
 * [new branch]      workflow -> workflow
Create pull request
Now that we have pushed our changes to the remote we will want to create a pull request so that they can be merged into the main branch. This will do a few things.
Initiate the process of merging code
Initiate the new workflow
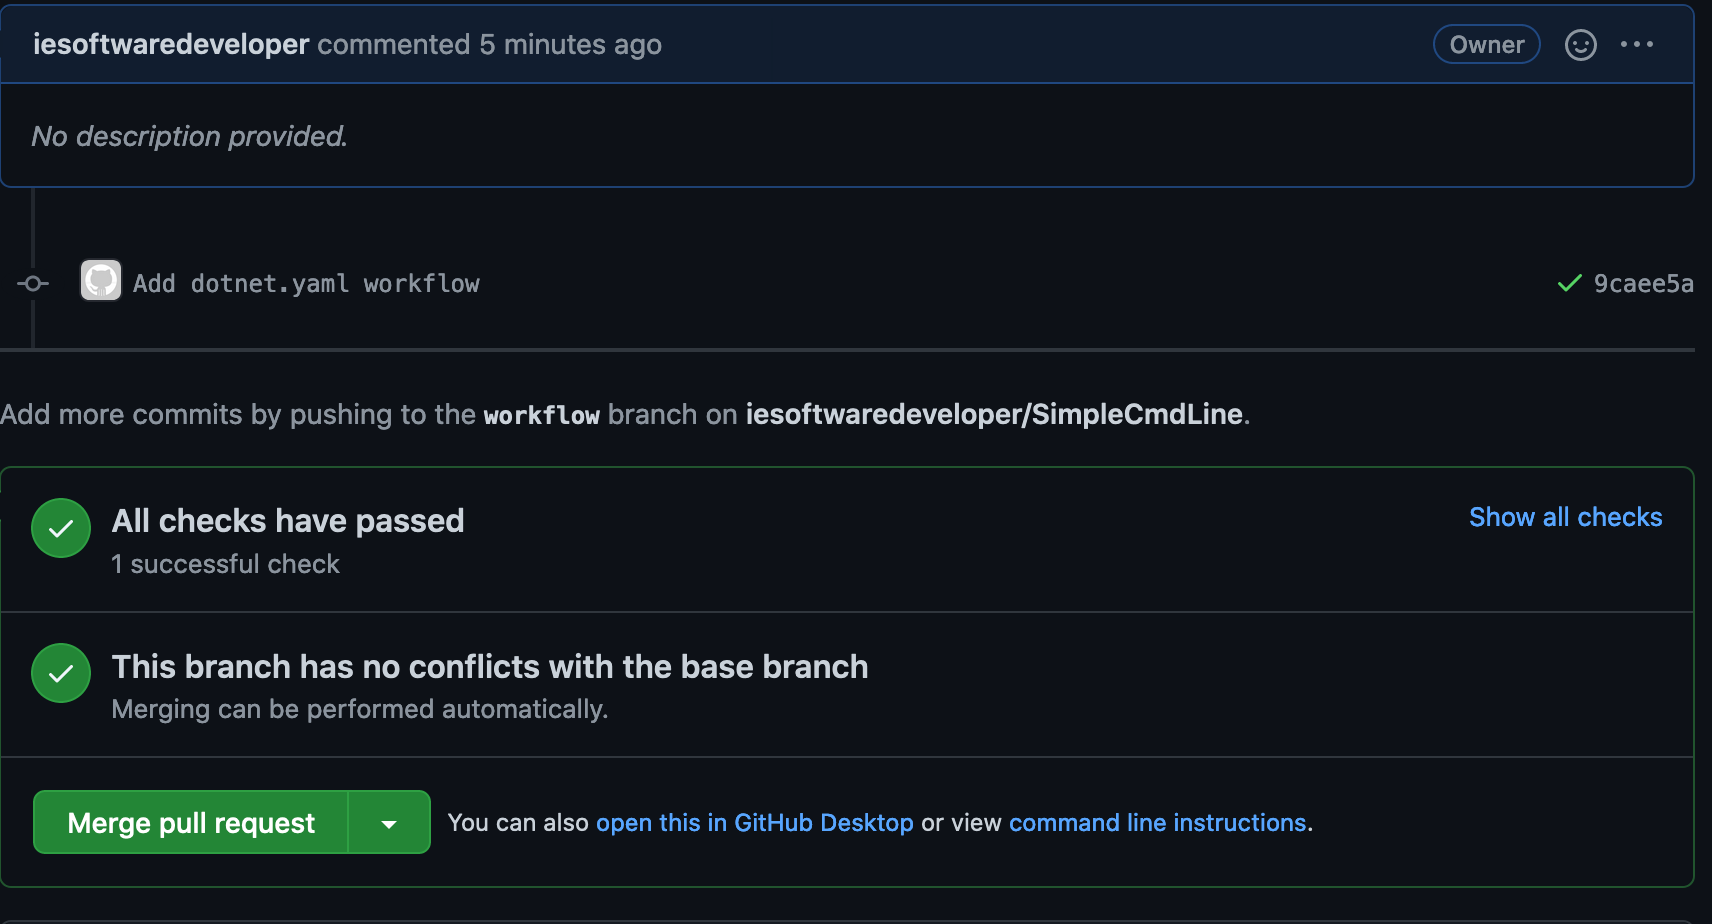
After initiating the pull request you will see that the workflow is triggered. This is because a pull request to main was made.
Once the workflow has completed the status of the workflow will be showed in the pull request. Wait until it shows completed and is green. If for some reason it does not complete successfully you will want to review the code changes and make any necessary updates to get the workflow passing as green.
Wth a successful completion of the workflow you can complete the pull request.
Conclusion
Your done. You have successfully added a simple dotnet workflow to your github project.
Using git as a Source Code Managment (SCM) tool is a great way to manage source code. While creating a example console application to demonstrate how to use System.CommandLine I documented most of what I was doing. I had originally included a lot of detail in that documentation.
After completing the documentation I decided that while it might be useful to me or someone else in the future, having all of that information in a single post was just too much. I decided to break up the content into smaller more managable parts. This is one of those parts.
Now is a good time to initialize your source repository. I am going to use a git repository to manage the source. If you are using a different source code management (SCM) tool to manage your source then be sure to use the respective commands for you tool. The steps are basically the same for all SCM tool.
Ensure that your are in the root directory for your new project and initialize the repository.
$ cd ~/SimpleCmdLine
$ git init
Initialized empty Git repository in /Users/iesoftwaredeveloper/repos/SimpleCmdLine/.git/
$
Add a .gitignore and README
To help ensure that we avoid committing files that we don't usually want in our git repos we should create a .gitignore file. Fortunately, dotnet can help us create a simple .gitignore that will accommodate some common files when developing using Visual Studio. If you are using Visual Studio Code the same .gitignore will also apply. If you are using a different Integrated Development Environment (IDE) or using a simple text editor then you will still benefit from creating the .gitignore using this method. Many of the items are created as part of the dotnet commands.
To create a dotnet focused .gitignore using the dotnet new gitignore command. While we are here I will create a basic README.md as well.
Note: The readme template is not installed by default. If you do not have it installed then dotnet will search NuGet for a matching template. I installed the template from author Rodolpho Alves named "Readme (Markdown)". You can install it using the command dotnet new -i ARDC.Commons.Templates::0.2.1 This is entirely optional and you can certainly just manually create your own README.md
$ dotnet new gitignore
The template "dotnet gitignore file" was created successfully.
$ dotnet new readme
The template "Readme (Markdown)" was created successfully.
$ git add .gitignore
$ git add README.md
$
Add initial template files
Now that we have initialized the git repo and added a .gitignore, go ahead and add the intial files created by template and commit them. Since there are only two of files I will add them individually. Once the files are added we can commit the changes to the repo.
$ git add src/Program.cs
$ git add src/SimpleCmdLine.csproj
$ git status
On branch main

No commits yet

Changes to be committed:
  (use "git rm --cached <file>..." to unstage)
    new file:   .gitignore
    new file:   README.md
    new file:   src/Program.cs
    new file:   src/SimpleCmdLine.csproj

Untracked files:
  (use "git add <file>..." to include in what will be committed)

$ git commit -m "Initial commit"
You could add all of the files in the directory using git add . or git add src to add the files in the src directory.
Create branch and add remote
Now that we have made our first commit we can push our local repository to a remote. I want to make sure that the current branch which is the default is named main to match the default branch name I use on my remote git repository. In this case it is, but if your git instance still uses a default branch by some other name this will ensure it is named main.
Once we have (re)named the local branch we can add the remote and push it to the remote repository.
Be sure to use your username for user and whatever you named your remote repository for repo
# Rename current branch to main (forcefully)
git branch -M main

# Set the new remote
git remote add origin git@github.com:user/repo.git

# Verify the new remote
git remote -v
> origin    git@github.com:user/repo.git (fetch)
> origin    git@github.com:user/repo.git (push)
Now that we have made our intial commit and set the remote we can push the changes to the remote.
$ git push -u origin main
Enumerating objects: 7, done.
Counting objects: 100% (7/7), done.
Delta compression using up to 16 threads
Compressing objects: 100% (7/7), done.
Writing objects: 100% (7/7), 3.97 KiB | 3.97 MiB/s, done.
Total 7 (delta 0), reused 0 (delta 0), pack-reused 0
To github.com:iesoftwaredeveloper/SimpleCmdLine.git
 * [new branch]      main -> main
Branch 'main' set up to track remote branch 'main' from 'origin'.
$
Conclusion
You now have a local repository and can push it to a remote repository.
As of this writing the package is in pre-release with version 2.0.0-beta1.21216.1. This means that to install it you will need to include the --prerelease flag when installing with dotnet add package.
See the Resources for links to resources referenced in this post.
There are a number of features in this tool and I encourage you to visit the NuGet page or the GitHub site for the latest information.
Once you have configured the command line with the available commands, options, arguments, directives and delimiters you can run your application and pass in the arguments. CommandLine will parse the tokens provided on the command line and evaluate them against the configured command line.
If there are any errors CommandLine will intercept the execution and will output some usage text. This text is a standard output that provides usage information. If you were to initialize a command line without any additional options you would have two built in options available --help and --version. Using the --help option would provide you output similar to below.
Usage:
  ConsoleApp [options]

Options:
  --version         Show version information
  -?, -h, --help    Show help and usage information
If you are running a console application the usage information or any other output from CommandLine will be output to the standard Console output. This is generally an intended behavior. If you are writing a unit test you might want to be able to capture that output for inspection. Or perhaps you want to save the output to a file instead. You can redirect the output to another source by implementing your own IConsole.
The IConsole interface
The IConsole interface defines how output is directed. The default implementation of IConsole simply redirects the output to the standard input, output and error locations. By implementing your own IConsole you can change where the output is directed.
We can start by creating a new class that uses the IConsole interface.
public class CustomConsole : IConsole
{
    public IStandardStreamWriter Out => throw new NotImplementedException();

    public bool IsOutputRedirected => throw new NotImplementedException();

    public IStandardStreamWriter Error => throw new NotImplementedException();

    public bool IsErrorRedirected => throw new NotImplementedException();

    public bool IsInputRedirected => throw new NotImplementedException();
}
There are 2 methods and 3 properties that need to be implmented. Out is where standard output will be directed. Error is where error output will be directed. The remaining properties are used to indicate if the othe streams have been redirected.
The flags are used to alter the rendering of output that is generated. If the output is redirected then some color coding of output will not be done. We can safely set these values to false.
    public bool IsOutputRedirected => false;
    public bool IsErrorRedirected => false;
    public bool IsInputRedirected => false;
We need to initialize the Out and Error to a new IStandardStreamWriter value. To accomplish this we will create an constructor.
The constructor takes two arguments. Both will default to null if not provided. In the body of the constructor we can setup a simple check to see if a value was passed for either of the paramemters. If a non-null value is passed in then we can set the relevant values.
        if (stdOut != null)
        {
            Out = stdOut;
        }

        if (stdError != null)
        {
            Error = stdError;
        }
What if we only pass in a value for stdOut? What happens if we do not assign a value to Error? If there are no values assigned to Out or Error then the application will throw an error. To ensure that a valid value is assigned we can use an alternate path if no value is provided in the constructor.
Ideally we would just assign the standard output and standard error if new values are not provided. For error this would be Console.Error. Console.Error returns a TextWriter and we need an IStandardStreamWriter. There is a simple way to get what we need. Using the StandardStreamWriter.Create() method we can pass a TextWriter and get back an IStandardStreamWriter. We can do the same for the Console.Out which is the standard output.
        if (stdOut != null)
        {
            Out = stdOut;
        } else {
            Out = StandardStreamWriter.Create(Console.Out);
        }

        if (stdError != null)
        {
            Error = stdError;
        } else {
            Error = StandardStreamWriter.Create(Console.Error);
        }
After all of that our new class should look like this.
public class CustomConsole : IConsole
{
    public CustomConsole(IStandardStreamWriter stdOut = null, IStandardStreamWriter stdError = null)
    {
        if (stdOut != null)
        {
            Out = stdOut;
        } else {
            Out = StandardStreamWriter.Create(Console.Out);
        }

        if (stdError != null)
        {
            Error = stdError;
        } else {
            Error = StandardStreamWriter.Create(Console.Error);
        }
    }

    public IStandardStreamWriter Out { get; }
    public IStandardStreamWriter Error { get; }

    public bool IsOutputRedirected { get; } = false;

    public bool IsErrorRedirected { get; } = false;

    public bool IsInputRedirected { get; } = false;
}
Redirecting Out
With our new class defined we are ready to direct the standard output to a new output. This could be a file or any other stream that can be a TextWriter.
We will start by instantiating the new CustomConsole;
IConsole console = new CustomConsole(StandardStreamWriter.Create());
The Create() method is missing a parameter which is a TextWriter. So now we need to create a text writer.
TextWriter tw = new StreamWriter();
The TextWriter is abstract and cannot be instantiated directly. It must have an instance that implements a Stream. We need to create an implementation of a Stream that we can write to. We can use a MemoryStream. Here is the code after creating a MemoryStream and TextWriter.
MemoryStream ms = new MemoryStream();
TextWriter tw = new StreamWriter(ms);

IConsole console = new CustomConsole(StandardStreamWriter.Create(tw));
With a new console created we now need to get the CommandLine to use it. This is done by passing it as an argument to the Invoke or InvokeAsync method.
rootCommand.InvokeAsync(args, console);
CommandLine will now use the CustomConsole to output instead of the standard output.